Carve a Woody with Mike - 3
As I progress with the carving I will post photos and some description
of the processes that I have used. Just left-click on the small pictures to
see a larger image.
I hope you will join me in the fun!
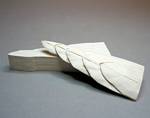 |
To make the primary inserts, I drew an outline on a 1" thick piece of tupelo and cut it out. I then split the piece into two 1/2" slices. By turning one block over you have a matching set of primaries! This picture shows one insert almost completed and one still in it's block stage.
(left-click on the picture for a larger view) |
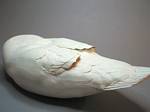 |
With the primaries constructed, I began to layout the wing covert feathers so I can undercut them for the primary inserts.
(left-click on the picture for a larger view) |
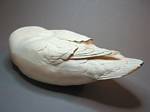 |
The rest is just trial and error! This picture shows the first try at inserting the primaries.
(left-click on the picture for a larger view) |
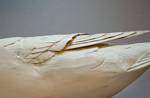 |
After working to get the inserts in place I am now satisfied with the fit.
(left-click on the picture for a larger view) |
 |
This is what it looks like with the insert and the head sitting on the body.
(left-click on the picture for a larger view) |
Back |