Carve a Woody with Mike - 2
As I progress with the carving I will post photos and some description
of the processes that I have used. Just left-click on the small pictures to
see a larger image.
I hope you will join me in the fun!
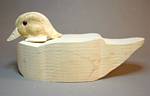 |
I forgot to take pictures when I started so here I am at an early stage. The body is still just a band-sawn block but I have already shaped and begun to texture the head.
(left-click on the picture for a larger view) |
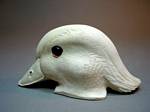 |
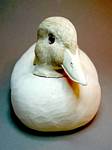
I like to do the head first to get a good feeling about the whole carving. At this stage I have shaped the head and bill. I have also textured the feathers using a small ceramic stone in a high-speed grinder. The has been set in the hole but the eye lid has not been made yet.
(left-click on the picture for a larger view) |
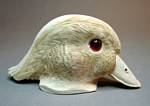 |
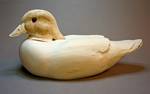
This is the head with the feathers burnt in using a Detail Master pyrographic pen. Note the flow of the feathers.
(left-click on the picture for a larger view) |
 |
I used a large typhoon bit in my Foredom tool and roughly shaped the body. I have decided to add the primaries as inserts so there is a sharp drop-off at the end of the wing coverts.
(left-click on the picture for a larger view) |
 |
Another view of the rounded body. I like to take particular care to ensure that there is no box-like shape to the body.
(left-click on the picture for a larger view) |
 |
This is the same view of the rounded body but I have now sanded the rough shape down so I can start to layout the feather groups on the body. I have also begun to shape the tail.
(left-click on the picture for a larger view) |